
Before you can start filming with your smartphone, you need the appropriate apps and gear. For faculty and staff, cost and usability are both concerns, so here are some suggestions for apps and simple equipment to use for video and audio recording.
For iPhones and iPads
VocaLive FREE– free to download and use with an iRig Mic Lav
https://itunes.apple.com/ca/app/vocalive-free/id419846636?mt=8
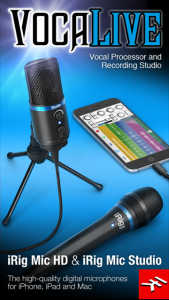
iRig Mic Lav (wired lavaliere/lapel microphone)
Use the iRig Mic Lav with VocaLive for both audio and video recordings on iOS devices, which it was developed for. See procedures below.
http://www.ikmultimedia.com/products/irigmiclav/
For Androids
Cinema FV-5 Lite– free to download from Google Play
Use this app instead of the onboard camera app. Cinema FV-5 Lite gives you access to control the exposure, ISO and other functions, as well as being one of the only free apps to recognize external mics, such as the Rode Smartlav+
https://play.google.com/store/apps/details?id=com.flavionet.android.cinema.lite&hl=en
Rode smartLav+ Lavalier Microphone for Smartphones and Tablets
The smartly + can be used on either iOS or Android devices and captures really good audio.
https://www.amazon.ca/Rode-smartLav-Lavalier-Microphone-Smartphones/dp/B00EO4A7L0
Smartphone Audio Gear
Sound is extremely important for filming, and for smartphone videos, it can mean the difference between someone watching your video or turning it off. Using an external mic is always recommended, but the built-in mic can also get decent audio if used properly.
Recording Good Audio on a Smartphone Using the Built-In Mic
If you do not have access to external smartphone mics to attach, then you have to shoot more conservatively to get effective sound quality. The built-in microphones on your phone are omni-directional, meaning that they pick up sound from all directions: infront of the camera, the sides and behind. This means sounds can be picked up more easily from background noise and from the camera operator (note: don’t chew gum while filming as the mic can pick that up).
So, in order to work with the limitations of a smartphone’s audio, it’s recommended to stay only 2-5 feet away from the subject. You don’t want to go too close as a phone tends to shoot with a wide-angle lens, so the closer you get (a foot or less), the most distorted the subject will become. Filming 2-5 feet away will give you the distance you need for both the lens and the audio, and it will allow you to frame your subject in a closeup (face), a medium shot (hip or belt-level to the top of the head) or a loose closeup/tight medium (sternum to the top of the head).
Recording Good Audio Using Smartphone Lavaliere Mics
Lavaliere mics (also called lapel mics as they are small, discreet mics that clip onto your lapel or shirt) tend to directional, meaning that pick up sound mainly from one direction (upwards to your mouth) and thus it is more focused on the voice.
Lavaliere Mics For iPhones and iPads
- iRig microphones ($50 USD) are lavalieres designed to work right with your iPhones, using their free app called VocaLive. Currently it’s only for iPhones, but some gear may be used with Androids. The microphone plug right into the pre-iPhone7 headphone jacks and easily used with the Camera app.
- http://www.ikmultimedia.com/products/irigmiclav/
Lavaliere Mics For Androids
-
Rode smartLav+ Lavalier Microphone ($89) – a lavaliere designed to work with both iPhone or Androids. The sound is really crisp and clear.
https://www.amazon.ca/Rode-smartLav-Lavalier-Microphone-Smartphones/dp/B00EO4A7L0/ref=sr_1_sc_1?s=electronics&ie=UTF8&qid=1515615715&sr=1-1-spell&keywords=rode+smartplav - BOYA BY M1 Lavalier Microphone ($26) – cheapest and most cost-effective out of the smartphone lavs, but the sound and build quality is not quite as good as iRig or Rode. Still, the sound is miles better than using no microphone at all.
- https://www.amazon.ca/BOYA-Lavalier-Microphone-Smartphones-Camcorders/dp/B00MRMU2HU/ref=sr_1_sc_1?s=electronics&ie=UTF8&qid=1515615773&sr=1-1-spell&keywords=smartphone+lavaliere+mic
Smartphone Shooting Procedures
Audio Recording Tips
- Put your smartphone into Airplane mode to avoid interference.
- Don’t choose noisy environments to shoot in. Listen to your environment for any loud sounds that may interfere BEFORE you start shooting, things like: fountains, construction, heavy traffic, kids playing, buses, airplanes, sirens, dogs, even heavy wind or rain. Choose something like a quiet room in the house or backyard or a park or a quiet spot on campus (although many rooms can sound very echoey). Some background noise, if it’s quiet, can be okay, but the basic rule is to choose the quietest place you can. If something suddenly happens while shooting after choosing a location, such a bus going by, just stop filming and wait for it to pass by.
- Move in closer with tighter framing. As mentioned, smartphones have a limited range for picking up sound without another microphone attached, so move to about 2-5 feet from your subject.
iPhones
Video Settings
- Set your phone to Airport mode to avoid interference
- Settings – Photo and Camera
- Record Video: 1080p
- Grid: On (for the Rule of Thirds)
Audio Settings
- Next, plug in the iRig lavaliere mic into the headphone jack of the iPhone (version before the iPhone 7).
- For the iPhone 7 Plus, since it doesn’t have a headphone jack, a Lighting-to-3.5mm adapter is plugged into the Lighting port, then the iRig lav is plugged into the 3.5mm port
- Open the VocaLive App
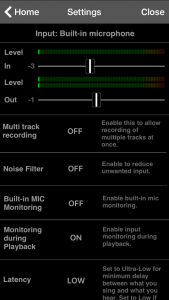
- Go to the top right corner in VocaLive with three horizontal bars
- Settings
- Background Audio: On
- At the top in the Settings, you’ll see your audio meters for measuring sound levels. Test your audio to make sure you’re in the Green-to-Yellow area for the average peaks in sound (average, not all of them). Avoid going in the Red area as your audio will “peak” and distort in the recording.
- The other Settings can stay the same.
- Use your Home bottom to get out of the program – there should be a solid red bar at the top of your phone indicating that the app is still working
Holding a Smartphone for Filming
Shoot in landscape/widescreen rather than portrait or vertical when shooting on a smartphone. Holding the phone vertically feels more natural, but it can look amateurish and, well, like it’s filmed on a smartphone. It creates a video with large black areas on either side when editing the video. Widescreen shots make it have the same sort of basic look as a tv show or movie, which is more of the standard format.
Keep your smartphone steady about a foot from your body if filming handheld. Handheld can be tricky, as the one filming can get shaky arms from holding the smartphone for too long. Using both hands can help keep it steady. Make sure not to cover the camera with your fingers.
Tripods and Grips/Tripod Mounts
Small tripods for smartphones include the Manfrotto MTPIXI-B PIXI Mini Tripod and the Joby JM3-01WW GripTight Stand, which has articulated legs that can even wrap around a pole or tree or merely adjust to uneven terrain. If you have a tripod, there’s the Shoulderpod S1 Professional Smartphone Rig, which allows for your smartphone to attach right to the top of the tripod.
Always keep in mind that your smartphone camera is also your microphone. Moving it further away will affect the audio quality of the shot.
Tripod Setup
- Extend the bottom most legs first
- Use the bubble level to ensure that the head is level. Tighten the legs to make it level. Loosen the knob beneath the head to move gyro on the tripod head to final adjustments.
- The panhandle is use to pan back and forth, or tilt up and down
- Screw the smartphone clasp/tripod mount into the plate and snap the plate into the head of the tripod.
- Ensure that the phone is held tightly in the clasp (it’s either knob-controlled or spring loaded).
Ready to Shoot
So now you have the iPhone in the tripod mount and your video and audio settings are set.
Place your subject to the right side of the frame, using the Rule of Thirds (see Pre-Production). In the Camera app, use the grid in Photo to get an approximate placement, then switch to Video (the Grid is not available for Video, so use it to approximate your framing of the subject).
Ideally, you can use basic 3-point lighting – the Key (main light), Fill (complementary side of the Key at half the brightness) and the Backlight (shining behind at the subject at their head and shoulders to outline them with light and separate them from the background with a half effect). Adjust the lights so that one side of the face is well lit, while the other side has some shadowing. Placing the light more dead centre with an even ratio towards the subject will give more even or “flat” lighting, which is more typical of news or talk shows.
However, if you’re shooting with a smartphone, it’s more likely that you’re going to be using ambient lighting: the sun, indoor lights, florescents and lamps.
When shooting with only sunlight, beware as it can easily overexpose your image.
Once the light is in place, you need to set your focus and exposure as they can automatically change, which you do not want in a controlled shoot.
Go back to the Camera app.
AE/AF Lock
- Tap and hold on the screen while in Video in the Camera app. The yellow square will flash and “AE/AF lock” will appear. AE refers to Auto-Exposure while AF is Auto-Focus. They are now locked but any adjustments made will not change automatically.
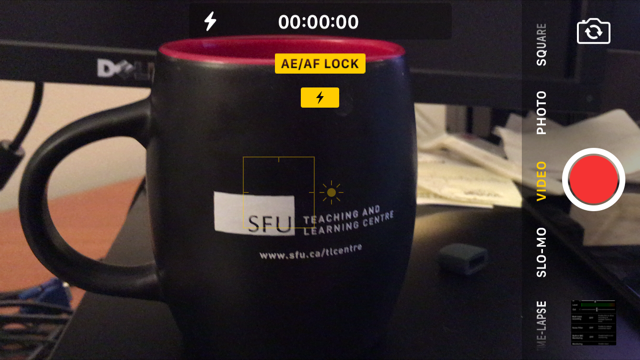
- Tap and hold the screen once to get the Focus control (AF) and Exposure control (AE – the sun icon next to the yellow square). Drag your finger up and down to open or close the exposure, thus letting in more light or less light.
- If you are using a really bright light or you are shooting in sunlight, your Exposure may have to come nearly all the way down.
- When you hold and tap on a certain part of the screen, the part that you tap on will be in focus. This works best if you have distinct objects in the foreground or background, as opposed to objects or subjects at the same distance from the camera.
- Pinch your fingers and then slide your finger to zoom in or out on Pictures only.
- Do not zoom in more than about 20-30% as the digital zoom will distort your image quality
- for video, you only have the option to film at 1x or 2x on the zoom, which is done by touching the circle that gives that option.
- Be careful with tapping and pinching as a another single tap can accidently remove the lock!
You can now start recording.
What to Remember When Filming (See Pre-Production section for more details)
- check for good available light and a quiet space
- Rule of Thirds
- Shot types (close-up, medium, wide, etc.)
- Headroom
- no camera motion or smooth motion – keep the camera as steady as possible when panning, zooming or tilting to avoid the shaky-cam look
- make sure that sound is recording properly in Voca-Live, on a second phone, or that you’re not more than 5-7 feet away from your subject
- check your exposure and focus
- don’t cross the axis
- allow a couple of seconds before and after you start filming so that nothing is cut off. You can trim excess footage later.
- if you have any inkling that you may need to reshoot something due to a loud noise or a technical glitch, redo it
External Audio recording
Recording on an Additional iPhone
If you can’t get close enough to your subject without wrecking your shot, then you may want to use a second iPhone to record your sound. The second phone can be placed immediately beside the subject, but make sure that it is not in your shot. Examples of placement include beside the subject with the body covering it from being in the shot, in the breast pocket with the microphone pointed upwards (so upside-down), or on a stand slightly out of frame.
- use the Voice Memos app to record the sound. It helps to clap with your hands in front of the camera so the visual clap and the auditory clap on the second phone can later be synced together.
- later, you can import the separate audio file into Camtasia or iMovie to edit
Audio (On a Zoom Audio Recorder)
An external audio recorder, such as the Zoom H4N, can greatly improve your audio quality when used with a good shotgun mic or lav mics. People will forgive poor shots or framing, but they will tune out or stop watching a video it if they can’t hear it. However, there is an extra layer of work involved as the audio on the Zoom is recorded independently of the camera, and will thus have to be synced up later in post-production.
Lavaliere Mics: Lav mics or lapel mics are clasped onto a subject’s jacket edge, tie, or lapel. These small mics are most common in interviews. They are generally placed a couple of inches up from the bottom of the sternum, in between your top and second button.
Test your audio. Lav mics can suffer from radio or cellular interference, or even from certain buildings. Interference can be introduced in the form of static, although sometimes it’s a simple as a connector not plugged in fully. Make sure your levels are not “peaking” which means it’ll be distorted.
Recording the audio. When you’re recording, make sure that the audio is audible, that you can clearly hear everyone who speaks. Aim for a gain or volume of between -6 to -12 db.