
Editing is used to tell your story through video. So you need a beginning, a middle and an ending, which is like saying that you introduce your story and set it up (beginning) and tell people what it’s about, then you go in detail describing that story (middle) and finally reach a climax and a conclusion about your story (end).
Think of how you tell a story verbally to another person: first you explain your story as to what it is you’re going to say, then you tell that story in a detailed way, and finally you wrap it up with a punchline or a something that’s learned that’s interesting about a change or a revelation of some sort.
Editing Notes and Tips

Adobe Premiere screenshot pictured above.
Organize your file folders before starting. Video tends to have a lot of files both within your hard drive and within the editing program, so keep it as organized as possible or you’ll find yourself lost very quickly. Have folders for each of the following to keep everything in place on your hard drive:
Video footage
Audio (voice, sound effects and music)
Photos/logos
Additional media (Youtube clips, other media)
Within the software itself, you’ll also create folders for:
Sequences
Titles (opening titles, lower thirds, credits, on-screen questions or information)
Create your Composition, Sequence or Project. Again, create Bins or Folders to organize your material before you start. Make sure you know where you are saving your project.
Edit according to your shot list, storyboard and script. Editing is the third place to form the story, and you can modify it accordingly. Try and find a good pace to the piece. Editing to music can help with the pace as you edit to the music. If you don’t have music, try to remember that a quicker is better. Try to edit out unnecessary pauses
Edit out anything unnecessary. Remove the parts that don’t directly relate to your story. Remember, shorter is better. If something seems extraneous or off-topic, it probably is, so edit it out of the piece.
Keep the editing simple when starting out. iMovie is a good program to start with as it doesn’t really allow you to make common mistakes. However, this also limits what you can do with the program (ie. no layering beyond adding titles). Professional programs like Final Cut and Premiere allow you to do a lot more, but they can also get complicated and confusing very fast. However, editing a more spartan video on a professional program can offer flexibility and added features if you learn it, while a basic program like iMovie can still produce quality videos if the content is good.
Length: most videos on social media should have a length of 2-3 minutes, or even shorter. A promo video of about :30 is ideal for social media. Educational videos can be up to 6 minutes long, but there’s some evidence it can be 10 minutes or longer if it’s engaging enough. Longer videos are acceptable if you have a captive audience with a subject they are interested in. Youtube does not effectively have limits in length, but social media like Instagram can limit video files to 1 minute lone, so know the venue where you want to put it.
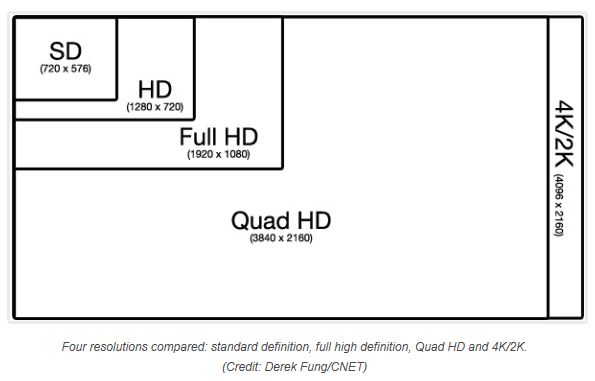
You can scale down, but not scale up. Scaling up, or zooming in on a shot in the editing process, will give you a blocky, pixelated, ugly look. Think of a jpeg. When you increase it’s size, it looks terrible. This is because the same amount of pixels are being used, so you’re zooming in on those scarce pixels when you punch in. However, this idea can work if your final product is a 1080p video and you’re shooting in 4K. Downscaling from 4K to 1080p will allow you to zoom in about 30-50% with no loss in quality.
Titles and Lower Thirds: Titles are used in the Opening Sequence or Credit Sequence, in the section titles, or to present information on screen or ask a question. Lower Thirds are the titles at the bottom part of the screen – the lower third – which identifies a speaker’s name with their position and/or organization. Titles and Lower Thirds would be on screen for 4-6 seconds. This can be extended if it doesn’t feel like there is a reasonable amount of time to watch and read the information. For fonts, try to steer away from really thin fonts. Din Pro is SFU’s standard font, with Helvetica and Futura being other common options.
Transitions: the cross-dissolve or fade is the most common transition. A fade of about 15 frames or half and second is a good average length to use. Other transitions, while used, often make the video look cheesy. A very quick transition of only a few frames is gives you a flash fade, often using white as a cross-dissolve colour.
Adding B-roll: B-roll refers to the additional insert shots that you use to create a more dynamic video. These are shots such as hands shaking, an audience at show, another person listening, something interesting happening in the background that relates to the topic, scientists performing duties in a lab. On top of making the video more dynamic, they also serve to act as transition shots to cover up cuts. Talking heads can become boring very quickly, so B-roll can make it more interesting.
Still photos and the Ken Burns Effect: stills and logos should only be onscreen for as long as they are interesting. A still with no movement should be onscreen for about 3-5 seconds. A way to add interest to a still is to do a slow zoom and pan across the photo, with what’s known as the Ken Burns Effect (iMovie had this built in). Not only is it more interesting than an immobile photo, it also allows you to extend the time of the clip, perhaps as long as 8-10 seconds. A good average length of time to have a photo or logo on screen is about 4-6 seconds.
Exporting and File Compression: Compression or transcoding refer to re-packaging the finished video into a format that is more usable and viewable, while reducing the size. Often the defaults of the editing program will suffice for exporting videos. Uploading to sites like Youtube will additionally apply its own compression.
However, this can sometimes be tricky as there are plenty of formats and compression can differ greatly among them. The program that I use the most is Adobe Media Encoder. Media Encoder works by dragging your project file right into Encoder. A pop-up will ask which Sequence you want to compress and you select it. You can then drag over one of the pre-formatted settings onto the file, such as exporting for Youtube. Many times, you can simply press the green triangle above to compress the file.
Software Recommendations
Before you can start editing, you need an editing program. For faculty and staff, cost and usability are both concerns, so here are some suggestions for software to use.
iMovie – usually free (available for Macs and iPhone/iPad)
Mac version – the desktop version is fairly simple with a few quirks, but some simple functions actually require workarounds.
iOS iPhone/iPad version – the iPhone version is simple to use with limited functionality, but the instant availability and portability are big plusses.
https://itunes.apple.com/ca/app/imovie/id408981434?mt=12&ls=1&v0=www-ca-mac-imovie-app-imovie
Snagit – $62.99 CAD
– a simple program for recording short, quick screencasts or videos with no editing.
https://www.techsmith.com/screen-capture.html
Camtasia – $264.47 CAD
– possibly the best all-around program as it is easy to use and it covers both screencasting and editing, as well as having a simple smartphone video transfer with the app Fuse. It’s a great screencasting program that’s also a very good video editor, easy to use and intuitive with a lot of functionality.
http://shop.techsmith.com/store/techsm/en_AU/pd/productID.289432000
ScreenFlow – $99 USD
– similar to Camtasia, cheaper but only on Macs
https://www.telestream.net/screenflow/store.asp
Adobe Premiere – approx. $50/month
– professional level editing program with the highest functionality, but it has a difficult learning curve
http://www.adobe-students.com/creativecloud/buy/students.html?sdid=KKTHS&mv=search&s_kwcid=AL!3085!3!194345952661!e!!g!!buy%20adobe%20premiere&ef_id=V6ISMgAABWsoxJNP:20170615202113:s#x
Tutorials: There are plenty of free tutorials including:
Lynda.com (free for SFU students, faculty and staff): https://www.lynda.com/
YouTube is another great resource for individual tutorials on particular topics, such how to emulate a style of editing or how to use a certain function in Camtasia or Premiere.
App Recommendations
Here are some suggestions for apps to use for editing video on iPhones and Androids.
iMovie – free on all iPhones
FilmoraGo – available free on Google Play for Androids
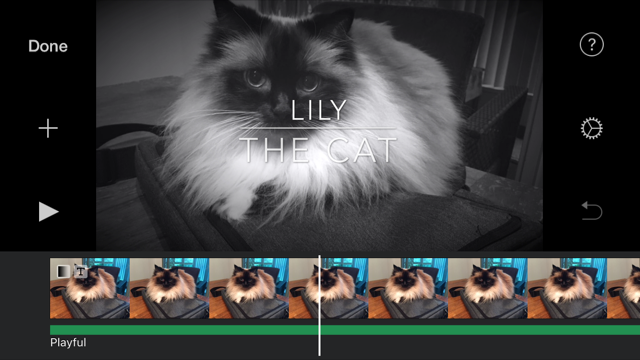
Editing in iMovie on an iPhone
Editing in iMovie on an iPhone is easy to do, but the features are limited. Learning to work within these limitations can actually free you up to perform simple edits without adding confusing extra settings and parameters.
iMovie on the iPhone (or iPad) allows to to make transitions (cuts, fades, dissolves, slides), add titles and add photos, videos, and audio. You can create a picture-in-picture look, create a split screen and use cutaways to overlay videos so that the audio from one track is headed beneath the video of another track.
Below is a screenshot of iMovie on an iPhone.
Trimming A Video Clip on an iPhone
https://www.imore.com/how-trim-video-your-iphone-or-ipad
- Launch the Photos app from your Home screen.
- Tap on the video you’d like to edit.
- Tap the hamburger menu on the bottom of the screen.
- Tap and hold on the left or right side of the timeline to engage the trimming tool.
- Drag the anchor left or right to trim (the yellow “<” arrows on either end of the clip).
- Tap and hold an anchor to expand the timeline for more precise editing
- Tap Done on the bottom right of the screen.
- Tap on Save as New Clip or Trim Original to replace the original clip.
Record a Voiceover on iMovie on an iPhone
- Press the + on the left side of the screen to add a Voiceover (above the timeline to the left of your shot). This takes you to a menu listing Videos & Photos.
- Scroll down and select Voiceover near the bottom.
- This will take you back to your timeline with an audio meters pop-up over your shot. Speaking into the iPhone to test the sound levels, you can see how the meters increase from the green bars into the yellow and red regions as you talk. Red indicates that the sound is “peaking” and it will distort the sound, so avoid going into the red. Your voice should register in the upper green to yellow range on average.
- Press Record when you are ready and a 3-second countdown will start. You can then speak into the iPhone. Press Stop when finished.
- A Recording Finished popup appears, and you can choose Cancel, Retake (re-record your piece), Review (listen to it) or Accept. When you press Accept, iMovie automatically places your voiceover on the timeline where your playhead is.
- Tap and hold down the voiceover and move it to whatever place on timeline you want.
Add Media to iMovie on an iPhone
https://support.apple.com/kb/PH3289?locale=en_US
Modify or Add Transitions to iMovie on an iPhone
https://support.apple.com/kb/PH3322?locale=en_US
Exporting Videos from your iPhone to a Laptop
- Plug in your phone to the computer
- Open Photos
- Import and Select your Videos
- File
- Export
- Export Unmodified Original for Videos (.MOV)
- Name and Select your folder on your Desktop
- Drag and Drop into the folder
Trimming a Video Clip on an Android Phone
-
Display the video in the Gallery. Do not play the video; just have it loitering on the screen. Videos in an album are flagged with the Play icon.
-
Choose the Trim command. Touch the Action Overflow or Menu icon to find the Trim command. In some versions of the Gallery app, the Trim icon appears on the screen, similar to the one shown in the margin. If you can’t see the icon, touch the screen. If it still doesn’t show up, the video is being shared from another source and cannot be edited.
-
Adjust the video’s start and end points. This is how to trim a typical video: Adjust the Start and End markers to trim the video’s length. Touch the Play button on the screen to preview how the shortened video looks. Adjust the Start and End markers further, if needed.
- Touch the Save or Done button to save the edited video.
Editing in FilmoraGo on an Android
Editing in FilmoraGo is fairly easy and intuitive. Details to come….
Editing in Camtasia:
Create a parent folder for all of your Camtasia projects.
Organize your files according to a file naming convention. Avoid using backslashes (/ or \) or special characters such as “+” or “%” in file names as these can conflict with operating systems or file compression .
Each project folder should have a date and a name that identifies which project it is. Filing first by date (when the project starts) allows you to sort the projects sequentially so that they are easy to locate.
Eg. 2017-07-12_Navigating_Library_website
Create subfolders in each project folder for asset Photos, Powerpoint, Video, Audio and Documents or Scripts. This will help to keep everything organized as video projects can easily grow and become unwieldy without proper organization.
Open up Camtasia. File>Save As your project name in your same-named project folder.
Using the app Fuse to connect files on your smartphone with your desktop Camtasia
- Fuse is an app used to seamlessly transfer photos and videos from your smartphone to your desktop version of Camtasia. It is available on both Androids and iPhones and for uses on Macs and PCs.
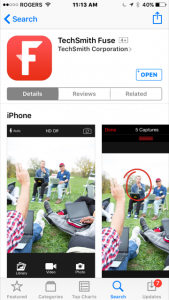
- With Fuse, you can record video or take photos, or import videos or photos that you presently have on your phone, and then easily transfer them over to Camtasia on your computer. Be aware that the Video has an HD setting at the top of the frame.
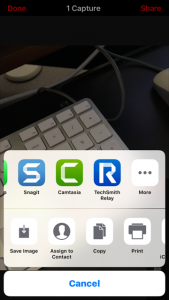
- To use Fuse, open up the app and choose either Photo or Video to record. An arrow with your thumbnail shows up near the bottom of the screen. Touching it shows you the photo where you crop it or add basic Paint-style writing or drawing on it from the tools on the right (not recommended).
- Open Camtasia on your desktop. Choose File<Connect Mobile Device. A QR code will pop up.
- On your phone, press Share at the top right. A popup from the bottom comes up, giving you options of where to send it. Near the end of the options, choose the Camtasia icon (as do other Techsmith products like Snagit and Relay). If connecting for the first time, a bracketed frame will pop up on screen. Point the phone’s camera at the QR code on the computer using the frames as guide. The computer will automatically recognize the code and Fuse is now paired to Camtasia. The media that you have selected will transfer over and will appear in the Media Bin of Camtasia. Your media is now transferred and ready to edit.
- To add media that is already on your phone, go the Library in Fuse and Choose Import, where you will access to your Photos and Videos.
Green screen Removal in Camtasia (Chromakey):
To find how how to remove a greenscreen from from a clip in camtasia, see this video: