
Video Editing Tips
Video has the ability to simultaneously appeal to auditory and visual senses, which combines text, music, sound effects, camera shots, graphics and photos to create more of a full-sensory experience. You can more readily experience the viewpoint of the speaker or filmmaker as it can make you feel closer to material as you experience what they do. In films, this can create empathy or sympathy for characters if done properly, which holds the interest of the viewer in an engaging way in which they want to see what happens in the story. In educational videos, while empathy or sympathy be irrelevant or not needed, the speaker does want the audience to learn, to be engaged, attentive and motivated. However, the same principles used in cinematic films can still apply to educational videos to enhance learning.
Here are some recommendations to make your educational videos more engaging:
- Pacing affects how slow or fast the video feels, regardless of its actual length. A video can feel like it has a good pace even when it’s longer, while a short, slow, badly-paced video can feel like it take forever. A video that’s too fast can race through information before it can be taken in by the viewer. Pacing includes the speed of the narrator’s voice, how quickly information is displayed, editing and music.
- Tone is the mood or atmosphere of a video and it turn how it makes you feel emotionally. A narrator’s voice and presentation can affect tone a lot. A lighter, excited, humorous tone can engage the viewer, whereas a flat voice and affect can make the video feel like a sleepy monotone.
- Music can help set the tone of your video, so choose a piece to match what you are presenting. A heavier subject matter with probably have some strings or piano. If your piece is light and informational, choosing a piece with a good beat can help to set the pace for the video, helping to move it along.
- Try to edit out pauses longer than about 2-3 seconds to keep the pace from lagging.
- Edit out any obvious technical glitches. It there’s a still image like a photo or PowerPoint slide, often these parts of the clip can be “patched” over by copying a pasting an earlier part of the still over the glitchy part.
- Have three main points that you want to stress
Video Length
The length of your video should vary based on the purpose of the video. While 1-3 minutes is a good length for social media-driven videos (although even the most-shared video on Youtube are around 4 minutes), educational videos and tutorials do not need to be this short. The University of Rochester has indicated in a study that the optimal length for educational videos is about 6 minutes in length, or less. http://blog.edx.org/optimal-video-length-student-engagement
There’s also an indication from Kaltura that you can have successful educational videos up to 10 minutes minutes long, even up to 30 minutes if the material can be engaging. It should be noted that any video over 10 minutes would need valid reasons to being this long, such as being a short documentary or a TED-like video. If videos can be broken down in smaller chunks for learning, then that is preferable.
“Among all respondents the majority (71 percent) said they consider 10 minutes and less the best length, which may reflect, the report’s authors suggested, students’ preference for YouTube-length content. However, 22 percent of educators specifically suggested that the preferred length is between 10 and 30 minutes, reflecting “the popularity of the 12-minute TED video format.” – Dian Schaffhauser is a senior contributing editor for 1105 Media’s education publications THE Journal and Campus Technology
Tips for choosing your video’s length
- It helps to read your script aloud and time it. 150 written words should equal about 1 minute of video for the average speaker.
- Whenever possible, “chunk” out a longer video into shorter videos (anywhere from 1-6 minutes for tutorials and educational videos). This allows for the the topic to be dealt with in a digestible manner and viewers can easily choose and focus on the content they need to watch.
Post-Production and Editing Tips
- A call to action is a specific, such as going to a website or to contact someone specific, don’t hold your call to action to the end, especially for longer videos. Consider a clickable annotation that appears in the first few seconds if the video is longer than 3-4 minutes.
- Put your key messages at the start of the video, especially if the video is long.
- Concentrate on three main points or so
- Length of the title of the video can indicate expectations. If a title is long, academic and cumbersome, the viewer would expect the video to be the same. A very short title creates an expectation of a short video. Preview images of the video can also create expectations: if people are displayed in that thumbnail, then it’s often seen as lighter and fun, whereas if text is displayed, this may indicate that something will be learned in the video. http://adage.com/article/digitalnext/optimal-length-video-content/299326/
- This resource gives “13 Tips for Recording Your iPhone, iPad, or iPod”, which gives recommendations for screen capturing your smartphone with programs like Camtasia. https://blogs.techsmith.com/tips-how-tos/13-tips-for-recording-iphone-ipad-ipod/?utm_source=facebook&utm_medium=Paid+Social&utm_campaign=Blog%3A+Top+Posts+All-Time+-+Camtasia
Camtasia 2018 to 2020
The newest version of Camtasia is Camtasia 2020. Some of the new features include Themes, 60fps support and a new Library tab with pre-generated assets such as music, icons and backgrounds (these were available in previous versions and have been reinstated).
Here are the differences between Camtasia 2018, 2019, 2020 and other previous versions:
https://www.techsmith.com/camtasia-compare-versions.html
Camtasia: Screencasting and Editing
Best Practices in Camtasia 2018-20 (Macs)
A screencast is a video recording of a computer screen in real time, often accompanied by voiceover narration. They are used for a variety of needs such as website tours and software tutorials or demonstrations. Screencasts and videos can take information that was static and immovable and create a dynamic form of media in a way that static text and graphics cannot. Camtasia is a screencasting tool that is easy to learn, yet effective with multiple uses.
Camtasia is also a video editor, similar to other basic editing programs like iMovie. Video can be created and imported from your computer or directly from your smartphone (see the procedures for the linking and transferring smartphone app Fuse later on). Camtasia also has features like Annotations (such as text, shapes and arrows), Behaviours (animated text), Cursor Effects, Transitions (ie. fades), Visual and Audio Effects and Animations (scaling, tilting) that allow you to easily highlight the cursor or aspects of your screen with zoom-ins, spotlights, animated shapes, arrows and text. Lastly, by hooking up an external microphone, you can record a voiceover right in Camtasia. Camtasia 2018 also has a Library of assets, such as Intros, Lower Thirds, Motion Backgrounds and royalty-free Music.
Please note that Camtasia 3 and Camtasia 2018 or 2018 are not backwards compatible with previous versions.
File Organization and Structure:
The first thing to do before using Camtasia is to make sure that your files and folders are properly organized as video projects can quickly grow and get out of hand. Organizing your folders systematically allows you to search for assets later on or select assets to import without sorting through a mess of files.
Create a parent folder for all of your Camtasia projects.
Organize your files according to a systematic file naming convention that the entire department uses. Avoid using backslashes (/ or \) or special characters such as “+” or “%” or “?” in file names as these can conflict with operating systems, coding, exporting or file compression. Dashes (“-”) and underscores (“_”) can be used instead of spaces (spaces may interfere with web functions or cross compatibility with other OS types, although this is not always the case).
Each project folder should have a date and a name that identifies which project it is. Filing first by date (when the project starts) allows you to sort the projects sequentially so that they are easy to locate.
Eg. 2017-07-12_Navigating_Bennett_website
Create subfolders in each project folder for your Camtasia Project File, Photos, Powerpoint, Video, Audio, Library Camtasia Files (pre-generated Opening/Closing Titles) and Documents or Scripts. This will help to keep everything organized as video projects can easily grow and become unwieldy without proper organization.
To download the template and assets, go to SFU Vault, in the folder here: https://vault.sfu.ca/index.php/s/4K9ki9fBerVIqEn
Camtasia 2018-20 Procedures
Camtasia Training and Tutorials
If you haven’t been trained in Camtasia or you want a refresher, Camtasia’s company Techsmith has good introductory tutorials on their website.
Camtasia Tutorials
These tutorials support Camtasia 2019, 2018, 9 (Windows), and 3 (Mac).
https://www.techsmith.com/tutorial-camtasia.html
Lynda.com offers many tutorials (Lynda.com is free for students and staff at SFU). Topics are parsed into easily watchable segments and include everything from hooking up the microphone to editing, screencasting and exporting.
Camtasia 2018 Essential Training:
https://www.lynda.com/Camtasia-tutorials/Camtasia-2018-Essential-Training/709839-2.html?srchtrk=index%3a1%0alinktypeid%3a2%0aq%3acamtasia+2018%0apage%3a1%0as%3arelevance%0asa%3atrue%0aproducttypeid%3a2
Getting Started in Camtasia 2018-20
Create a parent folder for your project and all of the assets that will go into it, including media that you plan to import into your project, such as other videos, music or photos. Go to File>Save As your project in your newly created project folder (which should share the same name as the Camtasia file). Using the year and date first and then the project title allows you to better organize your projects when searching for them later.
Eg. Project folder name: 2017-07-12_Navigating_Bennett_website
Camtasia project name: 2017-07-12_Navigating_Bennett_website.camproj
Maintaining standard naming conventions can help you stay organized as video projects can quickly get out of hand with numerous video, audio, photo and other files that can get confusing over time.
The Camtasia 2018-20 Interface
Here are the basic features in Camtasia: the Canvas, the Timeline, the Media Bin, the Library and the Task Bar.
Camtasia 2018-20 Interface
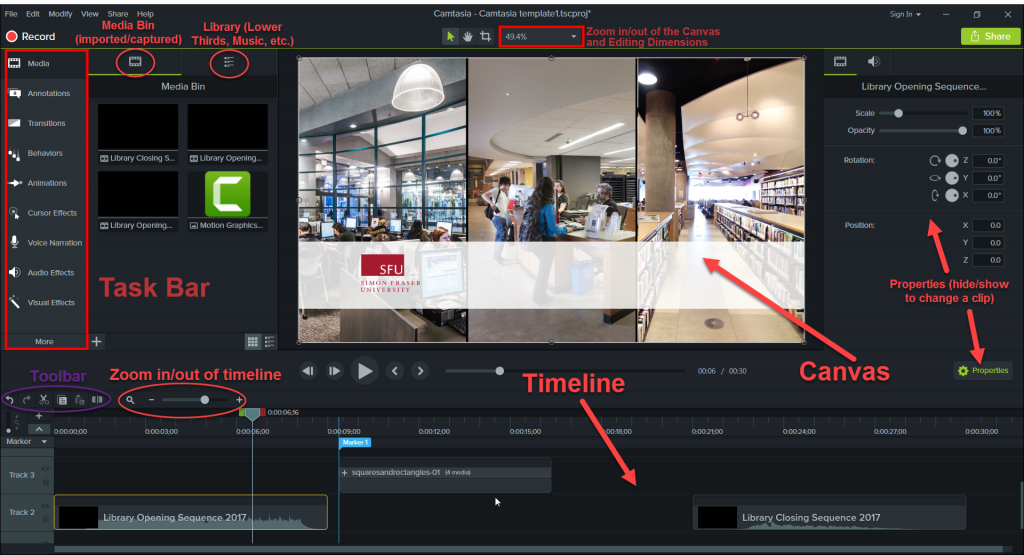
Task Bar (or Task Tabs)

These are the buttons above the Timeline on the left, including the Clip Bin, Library, Callouts, Zoom-n-Pan, Audio, Transitions, Cursor Effects, Visual Properties, Voice Narration, Record Camera, Captions and Quizzing.
Media Bin
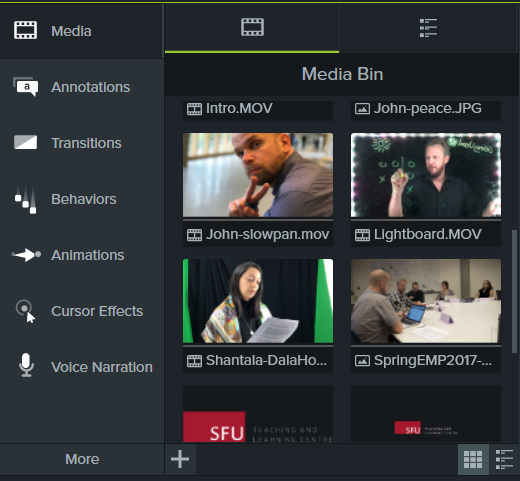
This is where your imported or captured media is stored in the top left corner, such as videos clips, music and screencasts. In some versions, clips will automatically sort into sections in video, audio and other formats.
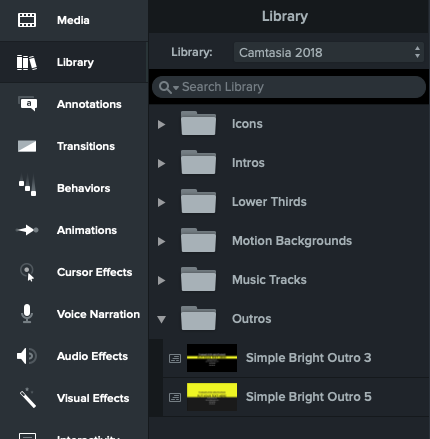
Library
Camtasia 2 does not have a Library like Camtasia 3 or any version on a PC. In other versions, it is located next to the Clip Bin on the Task Bar, the Library contains built-in media assets such as Callouts, music, animated backgrounds, lower thirds, and title clips. They are grouped into Themes which can be used to create a certain holistic look and feel to a video project.
Timeline

This is your working area at the bottom, displayed as tracks over time. Tracks can be moved and stacked on top of each other, and the video tracks at the top may cover up tracks below it. Animated Callouts can be placed overtop of video, such as arrows or shapes, however they will be superimposed without a background that allows the animation to be seen overtop the video. Audio tracks can be see as waveforms, where the volume can be raised or lowered..
Canvas
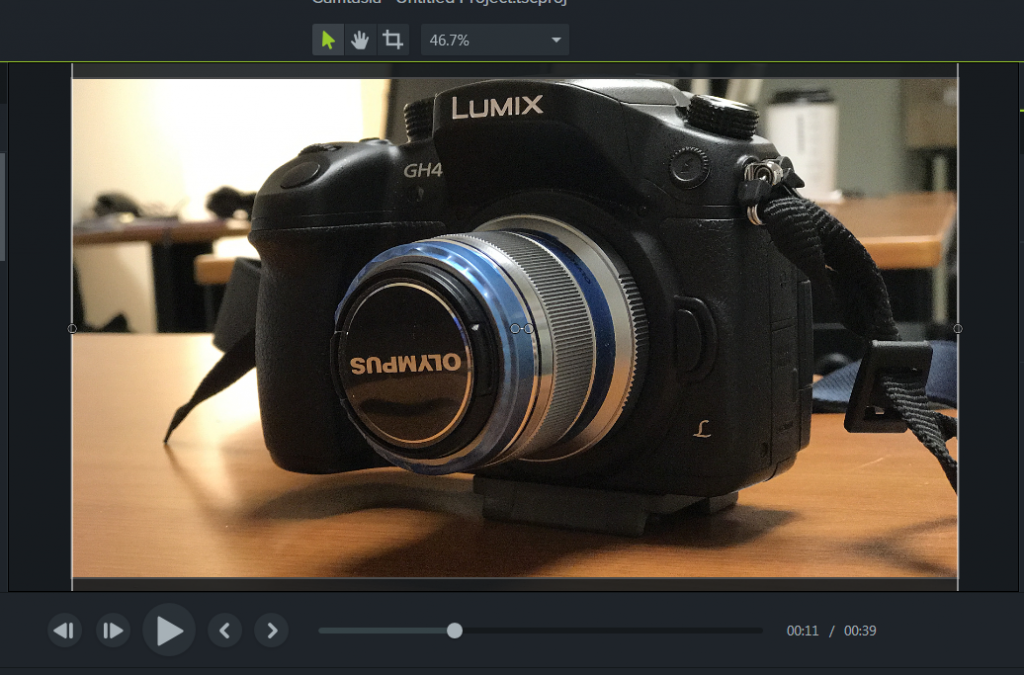
This is your working area where clips in the Timeline are displayed. You can move, rotate or resize your clips in the Canvas, using the Properties in the gear icon in the bottom right of the Canvas.
Beside that is the Canvas Zoom/Editing Dimensions drop-down menu in the bottom right of the Canvas on Camtasia 2. Note that the first number you see in that box is a percentage, which indicates the amount that the video is zoomed in for better visual clarity. This is NOT the changing the video editing dimensions, it just makes it easier to see certain parts of the clip. Click on the drop-down menu to go to Adjust Canvas to change the Editing Dimensions (resolution). Your video’s resolution is listed in the top left of the Canvas. Selecting another resolution will change your entire video’s resolution. Your video should be in 720p (1220 x 720) or 1080p (1920 x 1020). Most HD videos are now 1080p.
Hotkeys
Hotkeys or shortcuts are keystroke combinations used to speed up the process of editing. Here are the most commonly used hotkeys in Camtasia 2, many of which you’ll recognize from MS Word:
Camtasia 2018-20 (Macs)
Space Bar – Starts/stops playing your video on the timeline
Click and Drag the clip’s head or tail (beginning or end) to extend it fully or shorten it to your desired length
Command + C – Copy
Command+ X – Cut
Command + V – Paste
Command + S – Save *get in the habit of Saving continuously*
Command + Z – Undo
Command + A – Select all
Command T– Split Clip (Splits a clip into two parts) (S – Split Clip in Camtasia 9 or 3)
Command + or – – Zoom in and out of the Canvas (*this does not affect your Editing Dimensions)
Option + or – – Zoom in or out of the Timeline (the slider beneath the Timeline also controls this)
Camtasia 2018-20 (PC’s) Hotkeys and Shortcuts
Space Bar – Starts/stops playing your video on the timeline
Click and Drag the clip’s head or tail (beginning or end) to extend it fully or shorten it to your desired length
Ctrl + C – Copy
Ctrl + X – Cut
Ctrl + V – Paste
Ctrl + S – Save (Save continuously!)
Ctrl + Z – Undo
Ctrl + A – Select all
S – Split Clip (splits clip into two sections)
Ctrl + scroll wheel or +/- – Zoom in or out of the timeline
Ctrl + Home/End – Go to the beginning or end of the timeline
Left/Right Arrow – scroll one frame at a time on the timeline
Shift + Click on multiple clips in the Timeline to move them as a group (in a more temporary way than Ctrl + G)
Ctrl + G – Group clips together to move them and prevent accidental editing. Groups stay together until they are Ungrouped.
Ctrl + U – Ungroup clips (to edit Grouped clips, this must be done)
T – Add Transition
A full list of Camtasia 2’s hotkeys and shortcuts is located here: https://assets.techsmith.com/Docs/pdf-camtasiaStudio/Camtasia_Studio_2.4_Hotkeys.pdf
Microphone Setup for Camtasia
While your laptop’s audio may be adequate for some videos, having good, clear audio from an external microphone can really increase the quality of your video.
1. Setting Up the Microphone
Plug in your external mic via USB. Most mics will be plug-and-play on Macs, but it will require drivers to be installed on a PC.
If you are using a Blue Yeti microphone driver, Blue has a page to download it and a checklist for how to set it up after the driver is installed: http://www.bluemic.com/yeti-support/#
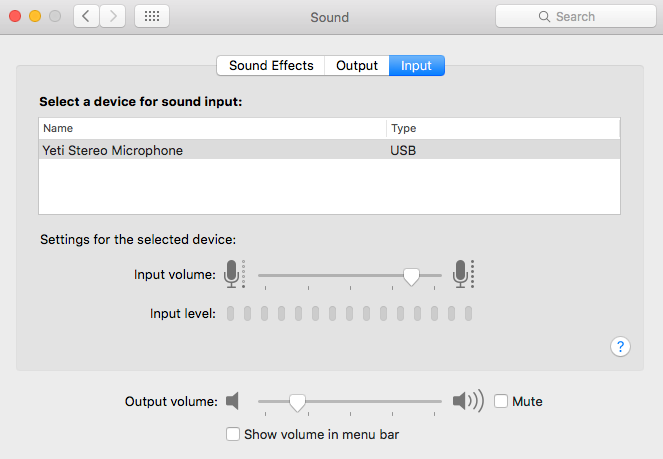
Mac Microphone Set Up
GO to System Preferences>Sound>Input and select your USB microphone. Then click over to Output and do the same if the mic is available (some mics do not have Output).
PC Microphone Set Up
Once your drivers or installed, or if your mic is plug-and-play, go to Control Panel<Sound<Playback and select your microphone if it has a built-in speaker or headset..
Then go to the Recording tab and select your microphone as well.
Press Okay.
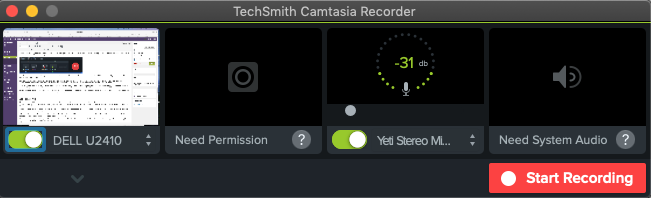
2. Test The Audio Levels
Camtasia 2018-20
Click on the Voice Narration or the Record Camera icon in the Task Tabs bar. Here you can test your levels with the meter under Input Level. When you speak into the mic, avoid going into the red or dark orange as the audio will be clipped and distorted. Your ideal average peaks when speaking should go into the far green, yellow or light orange range (-6 to -12 dB).
Adjusting the Microphone
You can adjust the Gain on the back of the Yeti microphone or simply move the mic closer or further away to get a better level. An ideal distance should be 4-6 inches away from the mic. See Microphone Recording Tips below for more information about recording voice and audio.
Here are additional tips from Techsmith on microphones, recording and editing audio and troubleshooting audio issues in Camtasia 2: https://assets.techsmith.com/Docs/pdf-camtasiaStudio/Get_Great_Sound_with_Camtasia_Studio_2.pdf
Titles and Lower Thirds
Titles in video can refer to two things. Opening or Closing Titles refer to the video’s name displayed at the beginning and end to introduce and close out the piece.
Titles are also (confusingly) used to describe any secondary video names, chapters, subheadings, and lower thirds. Lower Thirds are captions that appear in the lower third of the screen that quickly identify a speaker when they are talking on-screen (note: they are not used for voiceovers unless it’s a prominent person to be highlighted).
Lower thirds usually appear for about 4-6 seconds with an animation or fade-in at the bottom left that lists the person’s name, job title and often their organization. Here’s an example, with the name on the top line, and the person’s title and organization on the second line:
Jane Smith
Professor of Psychology, SFU
Screencasting
Recording a Screencast
To record a screencast, click Control + R (red button) on Camtasia 2018 or Record at the top left corner on Camtasia. You can also click File>New Recording. The Camtasia interface will minimize and a pop-up record menu for the TechSmith Camtasia Recorder appears that allows you to the select the area of the screen you want to record, whether it’s full-screen or a particular window, the microphone (select the external mic, if you have one), System Audio (the sounds that your computer makes, including any videos or music you play). You can select whether you want the webcam off or on. Make sure your audio has been set up properly, preferably with a good external microphone, and that you can see the levels in the meters.
Press Record when you are ready. The pop-up will minimize and a 3-second countdown flashes before the recording begins. Press F10 or Option-Command-2 to stop the recording.
Your screen then automatically maximizes back into Camtasia, with your new clip appearing in the Media Bin and on the Timeline.
Recording a screencast allows you to add Cursor Effects, located in the Task Bar. Here, you can make the cursor bigger or create a circular Highlight, Spotlight or Magnify effect around the cursor. Using these effects can help you to zero in on particular parts of the screen that you want emphasized and it allows the viewer to more easily follow the small cursor.
Use Record Camera in the Task Bar to allow you to record video just from your webcam (an external webcam may need to be installed). Properties can allow you to change settings such as Gain or Brightness, which will allow you to compensate for overly bright rooms.
Video Editing
Camtasia is a drag-and drop editing system. To add clips to the timeline, simply drag them down from the Clip Bin and onto the timeline. The same can be done for Library assets (lower thirds and music), Callouts or Transitions. Drag-and-drop also works for moving clips on the timeline, which allows you to edit in a non-linear fashion (ie. you do not need to to edit your video in order from start to finish as any part can be altered at any time).
As mentioned in the Canvas description of the interface, make sure that your final video’s resolution is in either of the common HD formats of 1220 x 720 or 1920 x 1020. You can adjust the setting of your timeline above the Canvas, where the resolution appears.
To bring in media that you want to incorporate into your video, such as photos, Powerpoint slides, music or external videos, go to Import Media at the top left or File>Import Media to find your media to bring in. You can also drag-and-drop clips right into the Clip Bin.
To see a clip’s properties, click on the clip and click Visual Properties in the Task Bar. This will allow you to change the Scale (size), Opacity (transparency) or Position of your clip in the Canvas. This can also be done directly in the Canvas itself.
To add a transition to a clip, click on Transitions in the Task Bar. When you click on a transition, every clip on the timeline will flash yellow at both ends to show you possible places where it can be put. Simply drag it onto the clip you want and it will appear. The default transition is a Fade, but clicking on transitions in the Task Bar will bring up a range of different (and mostly cheesy) transitions. Stick with the basic transitions such as Fade, Fade through black, Glow or Slide left/right (for Titles or Motion Graphics).
Audio Editing
To edit the audio within a video clip, there are two ways to do it. One way is to right-click on the clip and press Edit Audio, where you can then change its Volume or Fades. The other way is to split the audio and video from each other by right-clicking on the clip and pressing Separate video and audio. This allows you to work on the audio independently, but it also leaves the risk of accidentally moving the audio and leaving your clip out of sync. Separating the audio, however, can allow you to just use the audio for a voiceover. Right-click to Add Audio Point if you want more precise control over your audio levels, allowing it to raise and lower at different points by dragging the point up or down.
Right-click on a clip and choose Clip Speed to make a video clip faster or slower. This works well in a screencast where some slower tasks can be sped up for the viewer at times. Still photos or Callouts or Transitions simply need to be dragged out to make them longer.
Exporting Your Video
The last thing that you need to do is to export your video. Go to Share in the top left corner. There are options to export directly to Youtube or Vimeo, however, it is best to save it on a local drive as well. You can choose from a drop-down menu of formats and platforms to export to. Avoid the “screencast.com” options as these are for Techsmith’s own players. Choose Export to MP4 (1020p or 720p based on the resolution of your video, which is listed just above your Canvas as 1220 x 720 or 1920 x 1020 resolutions). Make sure that your exported video matches the resolution of your Editing Dimensions in the Canvas. The other default settings should be fine. Also ensure that you are registered and signed into Techsmith or it will not allow you to export.
Your video project on Camtasia 2018 is now complete!
Adding Smartphone Video to Camtasia 2018
You may want to incorporate video shot on your smartphone into your video in Camtasia. Fuse is an app that lets you bypass the need for cords and sorting through files as it allows you to transfer files from your phone directly into Camtasia via Wi-Fi.
Using Fuse to connect files on your smartphone to your desktop Camtasia
- Fuse is a free app used to seamlessly transfer photos and videos from your smartphone to your desktop version of Camtasia. It is available on both Androids and iPhones and for uses on Macs and PCs.
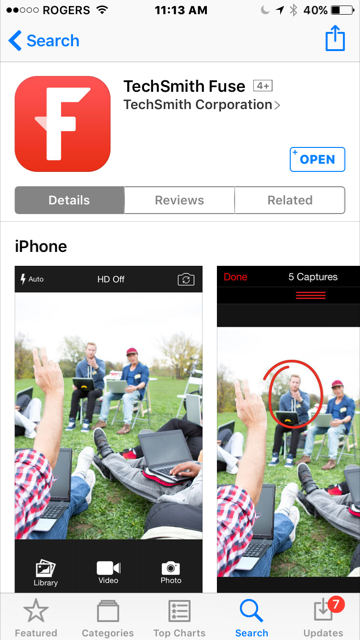
With Fuse, you can record video or take photos, or import videos or photos that you presently have on your phone, and then easily transfer them over to Camtasia on your computer. Be aware that the Video has an HD setting at the top of the frame.
First, make sure that your smartphone and your computer are on the same Wi-Fi network. Open up Fuse and choose either Photo or Video to record. An arrow with your thumbnail shows up near the bottom of the screen. Touching it shows you the photo where you crop it or add basic Paint-style writing or drawing on it from the tools on the right (not recommended).
To add and transfer media that is already on your phone, go the Library in Fuse and choose Import, where you can access to your Photos and Videos. Select any media you want to bring into Fuse to transfer.
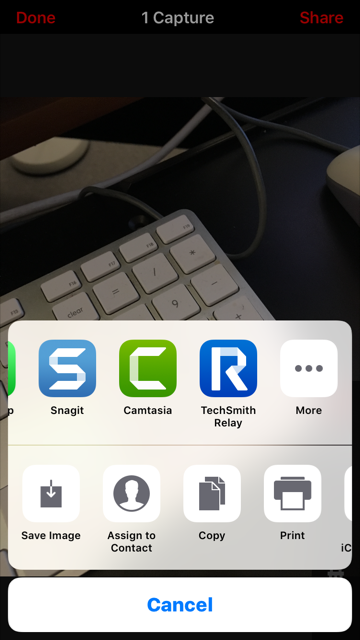
Open Camtasia on your desktop. Choose File<Connect Mobile Device. A QR code will pop up. On your phone, press Share at the top right. A popup from the bottom comes up, giving you options of where to send it. Near the end of the options, choose the Camtasia icon (as do other Techsmith products like Snagit and Relay). If connecting for the first time, a bracketed frame will pop up on screen. Point the phone’s camera at the QR code on the computer using the frames as guide. The computer will automatically recognize the code and Fuse is now paired to Camtasia. The media that you have selected will transfer over and will appear in the Clip Bin of Camtasia. Your media is now transferred and ready to edit. The speed of the transfer will depend on your Wi-Fi network and the size of the files.
Microphone Recording Tips
Note that Volume refers to the sound you hear in the headphones, while Gain is an actual measurement of the sound in decibels. To get a proper recording level, the Gain is adjusted, whereas if it is too loud in your headphones, adjust the Volume.
Sit about 3-4 inches from the mic. If you find that this is too far, adjust the Gain on the mic to increase the level or move in closer. Enunciate clearly and read or narrate at a consistent pace. Use your headphones when recording to make sure that you can hear how clearly your voice is being picked up. Adjust your distance away from the mic if you constantly hear your own breath blowing into the mic.
Adjust the polar pattern on the mic for the correct pick-up. The Yeti’s polar patterns are listed below. The knob for these is located at the rear of the mic.
-
- Cardioid: Sensitivity is focused towards the front of the mic, largely eliminating background noise. Use this setting for individual recordings.
-
- Omni-directional: Sensitivity is in all directions, picking up sound from all around. Smartphones, camera microphones and most lavalier (lapel) mics have omni-directional mics (cardioid lav mics are used in headsets), so more background noise will be picked up. Use these settings for recording sounds all around the microphone, such as a meeting (mic in the centre of the group).
-
- Bidirectional/Figure Eight: Sensitivity is towards the front and the rear of the microphone. Use this setting for a conversation between two people sitting across from each other.
-
- Stereo: Sensitivity is multi-directional with dual left-right tracks, so use it when recording multiple instruments or voices at once.
Accessibility
Making a video accessible may include creating redundancies that can help people of all learning styles. Allowing for flexibility and additional forms of presenting information can help people who prefer to learn in different ways, such as a video having a written transcript. Here are examples of how to make videos more accessible:
- Close-caption your video with subtitles. This can be done in a couple of different ways. The captions can be “burned” into the video using Camtasia’s Captions (however, the captions would appear on all videos, with no way to turn it off). The second method is to use the Close Captioning function on social media sites like YouTube or Vimeo, where subtitles can be turned on and off by the viewer.
- Include a transcript either by attaching a PDF of the script or by including the text below the video.
- When editing with a screencasting program like Camtasia or Screenflow, use Annotations or Call-Outs to highlight or magnify cursors or areas of interest. Adding simple animations like moving arrows and shapes can help those who have have trouble following the small cursor, but it can also make your video more dynamic by adding elements that engage the viewer.
- Add graphic elements such as photos, annotations, callouts, drawings or other video to help explain or illustrate concepts where visual attention is needed if it can better illustrate a point than with only text.
- In your script, avoid terms like “click here” and replace them with specific terms like “click the tab near the top that says Going Visual” so those who are just listening to the video will know what’s being talked about.
Royalty Free and Creative Commons Music and Sound Effects
Adding music and/or sound effects can enhance your video or audio piece. Here are some resources for royalty-free and Creative Commons audio works.
Free Music Archive is a good resource if you want to know more about what constitutes Creative Commons and it’s four licensing terms of Attribution, NonCommercial (“NC”), NoDerivatives (“ND”), and ShareAlike (“SA”). It defines each type of use and what that allows you to do.
Garage Band loops and music: Apple has stated that songs and music loop exported from Garage Band can be used in videos, provided that the music is not be repackaged and resold as original music.
https://support.apple.com/en-ca/HT201202
Free Music Archive FAQ: http://freemusicarchive.org/faq
To download music from Free Music Archive: http://freemusicarchive.org
CCMixter (Creative Commons – attribution)
Free Sound (requires registration/login to be created, includes music and sound effects): http://freesound.org
Sound Bible (includes music and sound effects): http://soundbible.com
Incompetech (some music here is not royalty free): https://incompetech.com/music/